These Red Velvet Blossoms are a beautiful twist on classic red velvet cookies, combining a soft, chewy texture with rich chocolate flavor in every bite. I love making these cookies because they are simple to prepare, look stunning on a dessert table, and always feel extra special for holidays and celebrations. With their vibrant red color and sweet chocolate topping, they’re the perfect homemade treat to share with family and friends.

Why I Love This Recipe
- Beautiful and festive: I love how the bright red color makes these cookies stand out on any dessert table. They are especially perfect for Christmas, Valentine’s Day, and holiday cookie exchanges when you want a treat that looks as good as it tastes.
- Soft and chewy texture: These cookies have a tender, melt-in-your-mouth texture with a slightly crisp edge and a soft center. Every bite is packed with classic red velvet flavor and a sweet chocolate surprise on top.
- Easy to make: This recipe comes together with simple pantry-friendly ingredients and doesn’t require complicated techniques. It’s a great choice when you want homemade cookies without spending hours in the kitchen.
- Perfect for sharing: Red Velvet Blossoms are always a crowd-pleaser and make a wonderful addition to cookie trays, family gatherings, bake sales, or homemade gifts for loved ones.
- A classic flavor combination: The combination of rich cocoa, creamy chocolate, and sweet vanilla creates the signature red velvet taste that makes these cookies extra special and hard to resist.
Ingredients for Red Velvet Blossoms
Dry Ingredients
- 1 2/3 cups all-purpose flour (209g) — Measure by spooning the flour into the cup and leveling it off for accurate results. Avoid scooping directly from the bag, as it can add too much flour and make the cookies dry.
- 2 tablespoons natural cocoa powder — Use natural cocoa powder instead of Dutch-process cocoa. It reacts with the baking soda and vinegar to create the classic red velvet flavor and color.
- 1/2 teaspoon baking soda — Helps the cookies rise and creates a soft, chewy texture.
- 1/4 teaspoon salt — Balances the sweetness and enhances the chocolate flavor.
Wet Ingredients
- 1/2 cup unsalted butter (112g), softened — Use softened butter, not melted, to help the cookies hold their shape and prevent excess spreading.
- 1/2 cup brown sugar (105g) — Adds moisture, softness, and a subtle caramel-like flavor.
- 1/3 cup granulated sugar (67g) — Provides sweetness and helps create slightly crisp edges.
- 1 large egg, room temperature — Helps bind the dough and creates a smooth cookie texture.
- 1–2 teaspoons red food coloring — Gel food coloring gives a deeper red color with less added liquid, but liquid coloring can also be used.
- 1/2 teaspoon white vinegar — Reacts with the baking soda and cocoa powder to create the signature red velvet taste.
- 1 teaspoon vanilla extract — Adds warmth and balances the flavors.
- 2 teaspoons milk (10ml) — Helps bring the dough together and creates the perfect cookie consistency.
For Rolling & Topping
- 1/3 cup granulated sugar (67g) — Used for rolling the cookie dough balls to create a beautiful sugar-coated finish.
- 28–32 Hershey’s Kisses — Press into the warm cookies immediately after baking while they are still soft enough to hold the chocolate topping.
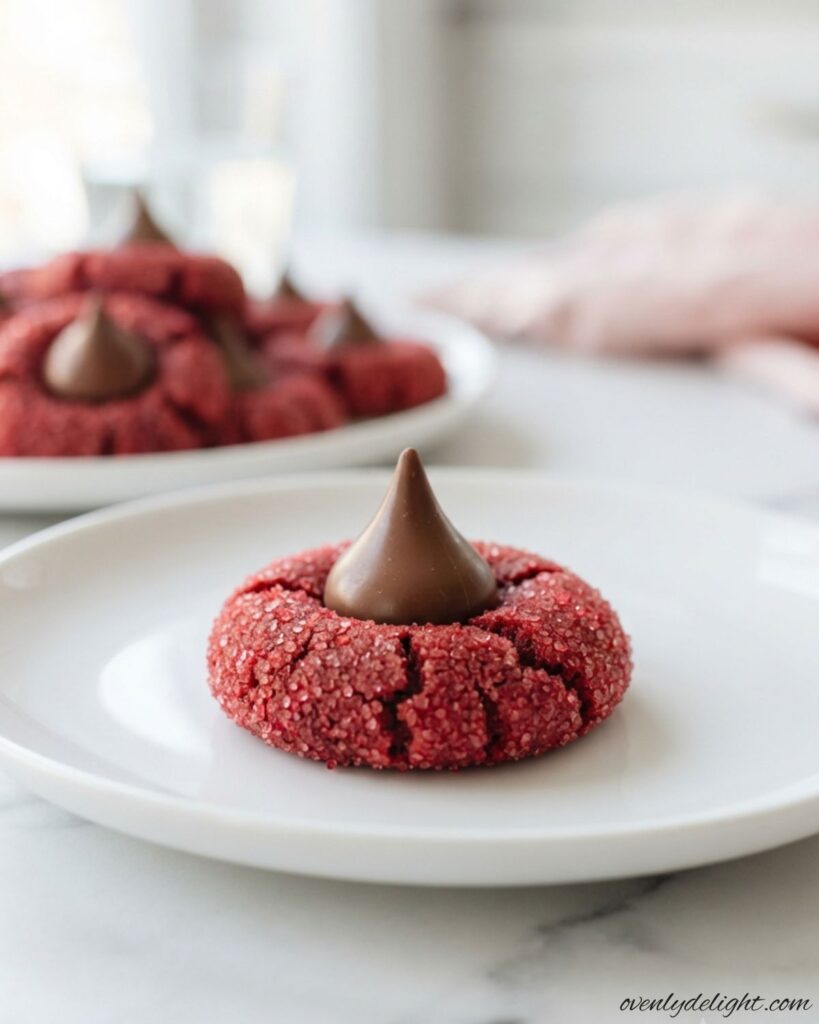
How to Make Red Velvet Blossom Cookies (Step by Step)
1. Whisk the dry ingredients
In a medium bowl, whisk together the all-purpose flour, natural cocoa powder, baking soda, and salt until evenly combined. Mixing the dry ingredients first helps distribute the cocoa powder and leavening agents throughout the dough, ensuring every cookie bakes evenly with the perfect red velvet flavor.
2. Cream the butter and sugars
In a large mixing bowl, beat the softened butter, brown sugar, and granulated sugar together until the mixture becomes light, smooth, and slightly fluffy, about 2 minutes. This step helps incorporate air into the dough, which creates softer cookies with a tender texture. Make sure your butter is softened but not melted for the best results.
3. Add the egg and flavorings
Add the room-temperature egg, red food coloring, white vinegar, and vanilla extract to the butter mixture. Beat until everything is fully combined and the color looks evenly bright red. The mixture may look slightly uneven at first, but continue mixing until the ingredients are completely blended and smooth.
4. Combine the wet and dry ingredients
Gradually add the dry ingredients to the wet mixture in two additions, mixing on low speed after each addition. Stop mixing as soon as you no longer see streaks of flour. Overmixing can develop too much gluten and make the cookies less soft. Add the milk at the end and gently mix until the dough comes together.
5. Chill the dough
Cover the cookie dough tightly and refrigerate for at least 2 hours. Chilling allows the flavors to develop and helps the butter firm up, which prevents the cookies from spreading too much during baking. This step is important for creating thick, soft, and perfectly shaped Red Velvet Blossoms.
6. Preheat the oven and prepare baking sheets
When you are ready to bake, preheat your oven to 350°F (175°C). Line two baking sheets with parchment paper to prevent sticking and help the cookies bake evenly. Allow the oven to fully preheat before baking for the best texture.
7. Roll and coat the cookie dough
Scoop the chilled dough into 1-tablespoon portions and roll each piece into a smooth ball. Roll the dough balls in granulated sugar until they are fully coated. The sugar coating gives the cookies their classic crackled appearance and adds a slight sweetness to the outside.
8. Bake the cookies
Place the sugar-coated dough balls onto the prepared baking sheets, spacing them about 2 inches apart to allow room for spreading. Bake on the middle rack for 9–10 minutes, or until the edges are set while the centers still look slightly soft. The cookies will continue to firm up as they cool, so avoid overbaking.
9. Add the chocolate kisses
Remove the cookies from the oven and let them cool for about 1 minute. While they are still warm and soft, gently press an unwrapped Hershey’s Kiss into the center of each cookie. Let the cookies rest on the baking sheet for 5 minutes before transferring them to a wire rack. This helps the chocolate stay in place and allows the cookies to set properly.
10. Cool and serve
Allow the Red Velvet Blossoms to cool completely before serving. Once cooled, the chocolate centers will become slightly firm while the cookies remain soft and chewy. Enjoy them with coffee, milk, or as a festive homemade dessert for any occasion.

Expert Tips for Perfect Red Velvet Blossom Cookies
- Don’t skip chilling the dough: Chilling the cookie dough for the full 2 hours is an important step for achieving thick, soft, and chewy cookies. If the dough is too warm, the butter melts quickly in the oven, causing the cookies to spread too much and lose their beautiful shape.
- Prepare the Hershey’s Kisses ahead of time: Unwrap all the chocolate kisses before you start baking. This saves time once the cookies come out of the oven and helps prevent the cookies from overbaking while you are trying to unwrap the chocolates.
- Choose gel food coloring for the best color: Gel food coloring is the best option for Red Velvet Blossoms because it creates a deep, vibrant red color without adding too much extra liquid to the dough. If using liquid food coloring, you may need a small adjustment in flour.
- Let the cookies cool slightly before adding the Kiss: Wait about 1 minute after removing the cookies from the oven before pressing in the Hershey’s Kisses. Adding them too quickly can cause the chocolate to melt too much and lose its classic shape.
- Measure flour correctly: For soft and tender cookies, measure your flour carefully. Too much flour can make the cookies dry and cakey. Using a kitchen scale gives the most accurate results, but the spoon-and-level method also works well.
- Use natural cocoa powder: Natural cocoa powder works best in this recipe because it reacts with the baking soda and vinegar, helping create the traditional red velvet flavor, texture, and color. Dutch-process cocoa may change the final appearance and flavor.
- Freeze the dough for fresh cookies anytime: These cookies freeze beautifully. You can portion the dough into balls, freeze them on a tray, and store them in a freezer-safe bag. Bake them whenever you want fresh Red Velvet Blossoms with minimal prep.
Ingredient Substitutions
Natural Cocoa Powder Substitute
If you don’t have natural cocoa powder, you can use another natural unsweetened cocoa powder. It will give a similar rich chocolate flavor while keeping the classic taste of the cookies. Avoid Dutch-process cocoa because it may slightly change the color and texture.
Unsalted Butter Substitute
Salted butter can be used instead of unsalted butter. Simply reduce or leave out the added salt in the recipe to maintain the right balance of flavors.
Dairy-Free Option
For a dairy-free version, replace butter with a plant-based baking stick and use almond milk or oat milk instead of regular milk. The cookies may taste slightly less rich but will still have a soft and tender texture.
Gluten-Free Option
Use a 1:1 gluten-free flour blend in place of all-purpose flour. Since gluten-free cookies can be more delicate, allow them to cool completely or a few extra minutes before serving.
Chocolate Topping Substitute
If you don’t have chocolate kisses, you can use small chocolate squares, chocolate chips, or your favorite chocolate candy. Press the chocolate into the warm cookies for a sweet finishing touch.
How to Store Blossom Cookies
Room Temperature Storage
Store completely cooled cookies in an airtight container at room temperature for up to 5 days. Keeping them sealed helps maintain their soft texture and prevents them from drying out.
Refrigerator Storage
For longer freshness, you can refrigerate the cookies in an airtight container for up to 10 days. The flavors may become even richer after a day or two as the chocolate and cocoa notes develop.
Freezing Baked Cookies
To freeze baked cookies, place them in a freezer-safe bag or container and store them for up to 3 months. When ready to enjoy, let them thaw at room temperature for about 20 minutes before serving.
Freezing Cookie Dough
You can also freeze the unbaked dough. Roll the dough into portions, freeze them on a tray until firm, then transfer to a freezer bag. Bake directly from frozen, adding 1–2 extra minutes to the baking time.
Quick Softening Tip
If the cookies lose some softness after storage, warm them in the microwave for about 10 seconds to bring back a fresh-baked texture.
More Cookie Recipes to Try
- Red Velvet Cookies
- Double Chocolate Chip Cookies
- Chocolate Chip Cookies
- Brown Butter Chocolate Chip Cookies
- Almond Flour Chocolate Chip Cookies
- Peanut Butter M&M Cookies
- Dark Chocolate Peanut Butter Chip Cookies
Frequently Asked Questions
Can I make the cookie dough ahead of time?
Yes, you can prepare the dough ahead of time and store it in the refrigerator for up to 3 days. Keep it tightly covered, then let it sit at room temperature for a few minutes before shaping and baking.
Can I freeze the cookie dough?
Yes, the cookie dough freezes well. Roll the dough into portions, freeze them on a tray until firm, then store them in a freezer-safe bag for up to 3 months. You can bake the cookies directly from frozen by adding a couple of extra minutes to the baking time.
Why do my cookies spread too much?
Cookies usually spread too much when the dough is too warm or the chilling step is skipped. Make sure the dough is properly chilled and use softened butter instead of melted butter for the best shape.
Can I use a different chocolate topping?
Yes, you can replace the chocolate kisses with chocolate squares, chocolate chips, or another small chocolate candy. Choose a chocolate that melts well and complements the cookie flavor.
How do I keep these cookies soft?
Store the cookies in an airtight container once they have completely cooled. You can also add a small piece of bread to the container to help maintain softness for a few extra days.
Can I make these cookies without food coloring?
Yes, you can leave out the food coloring if desired. The cookies will still have the same delicious cocoa flavor, but they will have a more natural brown color instead of the traditional red velvet appearance.
Why are my chocolate kisses melting too much?
The chocolate kisses should be added after the cookies cool for about 1 minute. Pressing them into cookies that are too hot can cause the chocolate to melt and lose its shape.
Final Thoughts
These Red Velvet Blossoms are the kind of cookies that make any occasion feel a little more special. With their soft texture, rich cocoa flavor, and sweet chocolate center, they are a beautiful treat that’s easy to share with family and friends. Whether you’re baking them for a holiday cookie tray, a celebration, or simply a cozy day at home, this recipe is a delicious way to enjoy a classic flavor with a festive twist. I hope these cookies bring as much joy to your kitchen as they do to mine!
Red Velvet Blossom Cookies

Ingredients
Dry Ingredients
- 1 2/3 cups all-purpose flour 209g
- 2 tablespoons natural cocoa powder
- 1/2 teaspoon baking soda
- 1/4 teaspoon salt
Wet Ingredients
- 1/2 cup unsalted butter softened (112g)
- 1/2 cup brown sugar 105g
- 1/3 cup granulated sugar 67g
- 1 large egg room temperature
- 1 –2 teaspoons red food coloring
- 1/2 teaspoon white vinegar
- 1 teaspoon vanilla extract
- 2 teaspoons milk 10ml
For Rolling & Topping
- 1/3 cup granulated sugar 67g
- 28 –32 Hershey’s Kisses
Instructions
- Whisk together flour, cocoa powder, baking soda, and salt in a medium bowl.
- Cream softened butter, brown sugar, and granulated sugar until light and fluffy.
- Mix in the egg, red food coloring, vinegar, and vanilla extract until smooth.
- Gradually add the dry ingredients and mix until combined. Stir in milk to form the dough.
- Cover and chill the dough for at least 2 hours.
- Preheat oven to 350°F (175°C) and line baking sheets with parchment paper.
- Scoop dough into 1-tablespoon portions, roll into balls, and coat with granulated sugar.
- Bake for 9–10 minutes until edges are set and centers remain slightly soft.
- Cool for 1 minute, then press a Hershey’s Kiss into the center of each cookie.
- Let cookies cool on the baking sheet for 5 minutes before transferring to a wire rack.