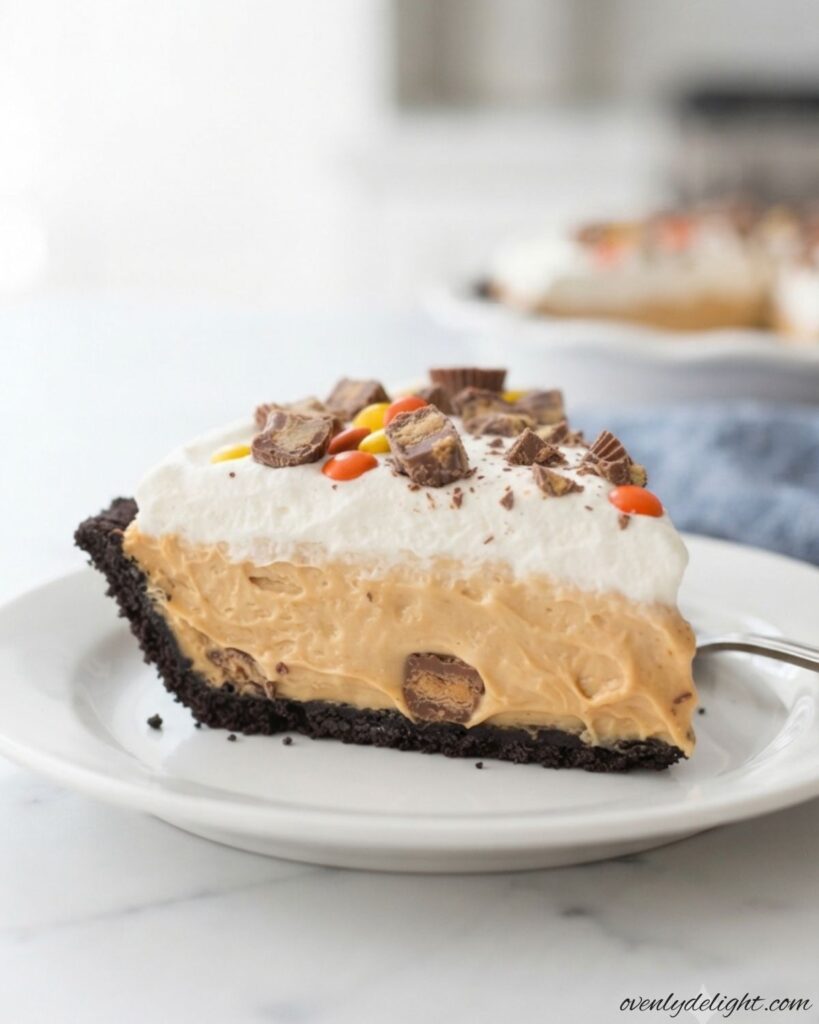
I always reach for this No-Bake Peanut Butter Pie when I want a dessert that’s easy to make but still feels extra special. It comes together with simple ingredients, requires no baking, and has the perfect combination of a buttery cookie crust and a smooth, creamy peanut butter filling.
Every slice is rich, light, and full of peanut butter flavor, making it a favorite for family gatherings, holidays, or whenever a sweet craving strikes. If you love homemade desserts, this peanut butter dessert is sure to become one of your favorites. It’s quick to prepare, easy to make ahead, and guaranteed to impress with every creamy bite.
Why You’ll Love This No-Bake Peanut Butter Pie
1. No-Bake Dessert That’s Perfect for Any Season
One of the best things about this no-bake dessert is that you don’t need to turn on the oven. It’s an excellent choice for warm summer days, busy holidays, or anytime you want a delicious homemade dessert without spending hours in the kitchen.
2. Rich, Creamy, and Full of Peanut Butter Flavor
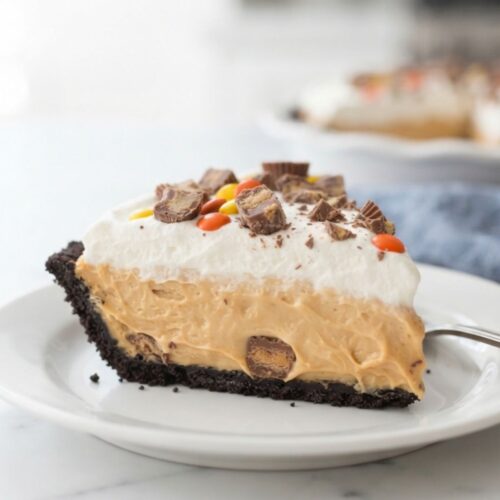
The filling is smooth, fluffy, and packed with rich peanut butter goodness in every bite. Paired with a buttery cookie crust, it creates the perfect balance of creamy texture and satisfying crunch that peanut butter lovers can’t resist.
3. Made with Simple Everyday Ingredients
This easy peanut butter pie recipe uses basic pantry staples that are easy to find at any grocery store. There’s no need for complicated ingredients, making it a convenient dessert you can prepare whenever a sweet craving strikes.
4. Perfect Make-Ahead Dessert for Gatherings
Since the pie needs time to chill, it’s an ideal make-ahead dessert for holidays, birthdays, potlucks, and family dinners. Simply prepare it in advance, refrigerate until set, and enjoy a stress-free dessert that’s ready when you need it.
5. Beginner-Friendly and Easy to Make
Even if you’ve never made a homemade pie before, this creamy peanut butter pie is simple to prepare. With easy-to-follow steps and no baking involved, you’ll have a beautiful dessert that looks impressive with very little effort.
6. Easy to Customize with Your Favorite Toppings
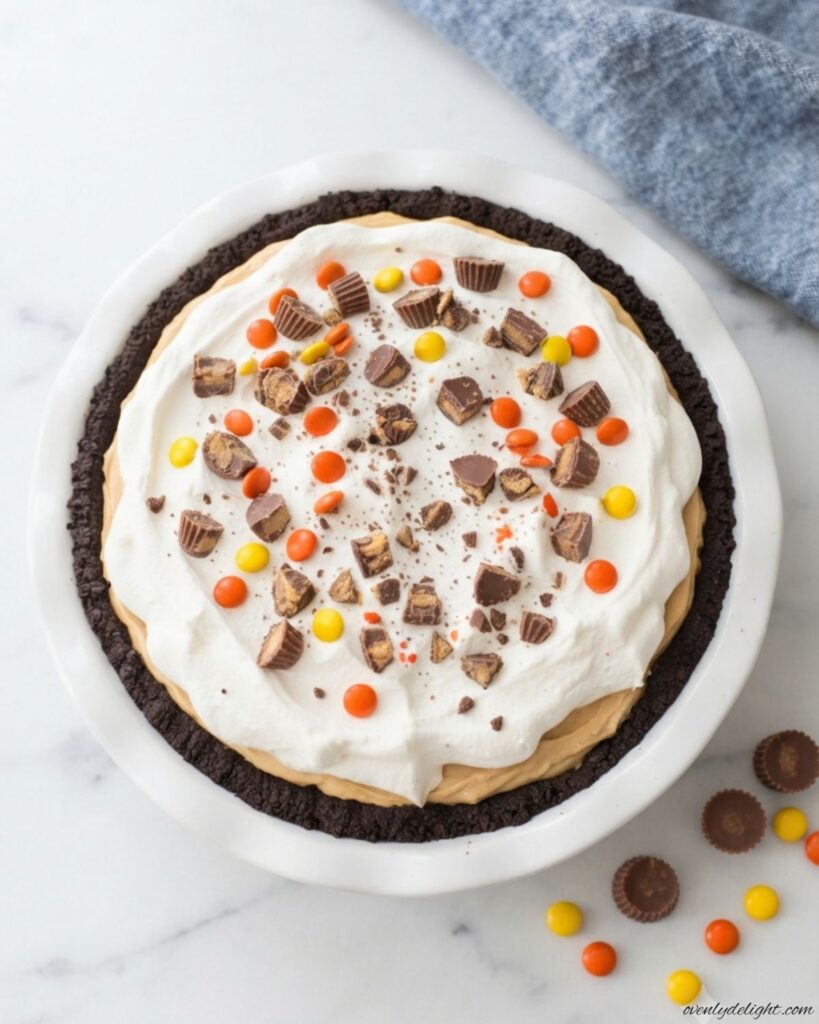
This pie is delicious on its own, but you can easily make it your own by adding whipped cream, chocolate shavings, chopped peanuts, peanut butter cups, or a drizzle of chocolate or peanut butter. These simple additions make every slice look bakery-worthy and add even more flavor to this irresistible dessert.
Ingredients for the Best No-Bake Peanut Butter Pie
Oreo Cookie Crust
- 25 whole Oreo cookies (about 300 g / 10.6 oz) – Use the entire cookies, including the cream filling. Crush them into fine crumbs for a firm, flavorful crust.
- 5 tablespoons (70 g / 2.5 oz) unsalted butter, melted – Mix with the cookie crumbs until evenly coated to help the crust hold its shape after chilling.
Creamy Peanut Butter Filling
- ¾ cup (180 ml / 6 fl oz) heavy whipping cream (33–35% milk fat) – Keep it cold and whip until stiff peaks form for a light, fluffy texture.
- 8 ounces (226 g) full-fat brick-style cream cheese, softened – Let it sit at room temperature for about 30 minutes so it blends smoothly without lumps.
- 1 cup (255 g / 9 oz) creamy peanut butter – Use regular processed creamy peanut butter for the smoothest consistency. Avoid natural varieties, as the oil separation can affect the filling.
- ¾ cup (90 g / 3.2 oz) powdered sugar – Sweetens the filling while keeping it silky. Sift only if it contains lumps.
- 1 teaspoon (5 ml) pure vanilla extract – Enhances the peanut butter flavor and adds a subtle sweetness.
Toppings
- ½ cup (120 ml / 4 fl oz) heavy whipping cream – Whip just before serving for a fresh, fluffy topping.
- ½ cup chopped peanut butter cups or ¼ cup Reese’s Pieces (optional) – Sprinkle over the top for extra crunch, color, and peanut butter flavor. You can also finish with a drizzle of melted chocolate or peanut butter if desired.

How to Make creamy peanut butter treat at Home
1. Prepare the Chocolate Cookie Crust
Place 25 whole Oreo cookies in a food processor and pulse until they become fine crumbs. Add 5 tablespoons melted unsalted butter and pulse again until the mixture resembles damp sand. This helps create a crust that holds together beautifully after chilling.
2. Press the Crust into the Pie Dish
Transfer the crumb mixture to a 9-inch pie dish. Firmly press it across the bottom and up the sides using the bottom of a measuring cup or glass. Place the crust in the freezer while you prepare the filling so it becomes firm and easier to slice later.
3. Whip the Heavy Cream
Pour ¾ cup cold heavy whipping cream into a chilled mixing bowl. Using a hand or stand mixer, beat until stiff peaks form, about 3–4 minutes. Set the whipped cream aside, as you’ll gently fold it into the filling later for a light, fluffy texture.
4. Mix the Cream Cheese and Peanut Butter
In a separate large bowl, beat 8 ounces softened cream cheese with 1 cup creamy peanut butter until completely smooth and creamy, about 2 minutes. Scrape down the sides of the bowl as needed to ensure everything is evenly blended.
5. Add the Sweeteners
Mix in ¾ cup powdered sugar and 1 teaspoon pure vanilla extract until fully incorporated. The mixture should be thick, creamy, and smooth without any lumps.
6. Fold Everything Together
Add the whipped cream in two batches, gently folding it into the peanut butter mixture with a rubber spatula. Fold just until combined to keep the filling light and airy. Avoid overmixing, as it can reduce the fluffy texture.
7. Assemble and Chill
Spread the filling evenly into the chilled cookie crust, smoothing the top with an offset spatula or the back of a spoon. Cover tightly and do not freeze to speed up the setting process because it can affect the creamy texture.
8. Garnish and Serve
Before serving, whip the remaining ½ cup heavy cream until soft peaks form and spread or pipe it over the chilled dessert. Finish with chopped peanut butter cups, peanut butter candies, or a drizzle of melted chocolate. Slice with a sharp knife, wiping it clean between each cut for neat, bakery-style servings.
Pro Tips for a Creamy No-Bake Peanut Butter Pie
1. Use Regular Creamy Peanut Butter
Choose a shelf-stable creamy peanut butter instead of natural varieties. Regular peanut butter creates a smooth, stable filling, while natural peanut butter can separate and make the mixture oily or prevent it from setting properly.
2. Let the Cream Cheese Soften First
Allow the cream cheese to sit at room temperature for about 30 minutes before mixing. Softened cream cheese blends effortlessly with the other ingredients, giving you a silky filling without small lumps.
3. Chill the Cookie Crust Before Filling
After pressing the crust into the pie dish, place it in the freezer for 10–15 minutes. This helps it firm up, making it easier to slice and preventing the crust from crumbling when serving.
4. Fold the Whipped Cream Gently
Use a rubber spatula to gently fold the whipped cream into the filling. Avoid vigorous stirring, as it removes the air from the whipped cream and results in a heavier texture instead of a light, fluffy consistency.
5. Give It Enough Time to Chill
For the best results, refrigerate the pie for at least 6 hours, or overnight if possible. The extra chilling time allows the filling to firm up, making each slice neat, creamy, and easy to serve.
6. Slice Like a Pro
Dip a sharp knife in hot water, wipe it dry, and clean it between each cut. This simple trick creates smooth, bakery-style slices and keeps the creamy filling from sticking to the blade.
7. Make It a Day Ahead
This dessert tastes even better after resting overnight. The flavors have more time to blend, and the crust softens slightly, creating the perfect balance of creamy filling and chocolate cookie base. It’s an excellent choice for holidays, birthdays, and potlucks because it’s completely ready before your guests arrive.

Easy Ingredient Swaps for This Creamy Dessert
Don’t have every ingredient on hand? These simple substitutions let you customize the recipe while keeping the same delicious texture and flavor.
- Chocolate Sandwich Cookies: Swap classic chocolate sandwich cookies for Golden Oreos if you prefer a sweeter vanilla-flavored crust. A store-bought graham cracker crust also works well when you’re short on time.
- Heavy Whipping Cream: For a dairy-free option, replace the heavy cream with well-chilled full-fat coconut cream (solid portion only). The filling will still be creamy, although it may be slightly softer after chilling.
- Cream Cheese: Use your favorite dairy-free cream cheese alternative if needed. It blends smoothly and creates a rich filling, though the final texture may be a little less firm.
- Creamy Peanut Butter: If you’re avoiding peanuts, substitute sunflower seed butter. It provides a similar creamy consistency and makes the dessert suitable for those with peanut allergies.
- Powdered Sugar: A confectioners-style monk fruit or erythritol sweetener can be used for a lower-sugar version. Avoid granulated sweeteners, as they won’t dissolve as smoothly.
- Cookie Crust: To make the dessert gluten-free, use gluten-free chocolate sandwich cookies or gluten-free graham crackers. Both create a sturdy crust with a delicious flavor after chilling.
How to Store and Freeze Peanut Butter Pie
Refrigerator
Cover the pie tightly with plastic wrap or store it in an airtight container. It will stay fresh in the refrigerator for up to 5 days, while the filling remains smooth and the cookie crust keeps its texture.
Freezer
For longer storage, wrap the whole pie or individual slices securely in plastic wrap, followed by a layer of aluminum foil. Freeze for up to 2 months. When you’re ready to enjoy it, transfer it to the refrigerator and let it thaw overnight.
Serving Tip
This dessert is best served well chilled. If you’re serving frozen slices, let them sit at room temperature for about 10 minutes before enjoying. This gives the filling time to soften slightly, creating the perfect creamy texture.
More Easy Dessert Recipes to Try
Frequently Asked Questions
1. How long does a no-bake peanut butter pie need to chill?
For the best texture, refrigerate it for at least 6 hours, although overnight is even better. Chilling allows the filling to firm up, making every slice smooth, creamy, and easy to serve.
Can I make this dessert ahead of time?
Yes! This is an excellent make-ahead dessert because it stays fresh in the refrigerator for up to 2 days before serving. For the best presentation, add the whipped topping and garnishes just before serving.
Why didn’t my filling set properly?
A soft filling is usually caused by using natural peanut butter, under-whipping the heavy cream, or not chilling the pie long enough. Using full-fat ingredients and allowing enough chilling time will help it set perfectly.
Can I use a ready-made pie crust?
Absolutely. A 9-inch chocolate cookie or graham cracker crust is a great time-saving option. Simply prepare the filling, pour it into the crust, and chill as directed.
Can I freeze leftovers?
Yes. Wrap the whole pie or individual slices tightly and freeze for up to 2 months. Thaw overnight in the refrigerator before serving for the best flavor and texture.
What are the best toppings for this dessert?
Fresh whipped cream, chopped peanut butter cups, crushed chocolate sandwich cookies, chocolate shavings, roasted peanuts, or a drizzle of melted chocolate all make delicious finishing touches while adding extra flavor and texture.
Final Thoughts
This No-Bake Peanut Butter Pie is the perfect combination of rich flavor, creamy texture, and effortless preparation. Whether you’re making it for a holiday, family gathering, or weekend treat, it’s an easy dessert that’s sure to impress. Give it a try, add your favorite toppings, and enjoy every delicious bite!
No-Bake Peanut Butter Pie

Ingredients
Chocolate Cookie Crust
- 25 whole Oreo cookies
- 5 tablespoons 70 g unsalted butter, melted
Creamy Filling
- ¾ cup 180 ml heavy whipping cream (33–35% milk fat)
- 8 ounces 226 g full-fat brick-style cream cheese, softened
- 1 cup 255 g creamy peanut butter
- ¾ cup 90 g powdered sugar
- 1 teaspoon pure vanilla extract
Toppings
- ½ cup 120 ml heavy whipping cream, whipped
- Chopped peanut butter cups or peanut butter candies for garnish
Instructions
- Crush the Oreo cookies into fine crumbs and mix with the melted butter until evenly coated.
- Press the mixture firmly into a 9-inch pie dish and freeze for 10 minutes.
- Whip the heavy cream until stiff peaks form, then set aside.
- Beat the softened cream cheese and peanut butter until smooth and creamy.
- Mix in the powdered sugar and vanilla extract until fully combined.
- Gently fold the whipped cream into the peanut butter mixture until light and fluffy.
- Spread the filling into the chilled crust, smooth the top, and refrigerate for at least 6 hours or overnight.
- Before serving, top with whipped cream and garnish with chopped peanut butter cups or peanut butter candies.